
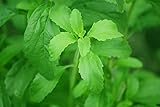
Delve into the wonders of nature’s sweet gift with the miraculous stevia plant – a versatile powerhouse of natural sweetness. Unlocking the boundless possibilities that this extraordinary herb offers, enthusiasts have discovered numerous techniques to incorporate its unique flavor profiles into various culinary endeavors.
Embracing the inherent characteristics of this remarkable botanical treasure, individuals seeking healthier alternatives to traditional sweeteners have turned to the stevia plant as their savior. Renowned for its exceptional ability to provide sweetness without any guilt-inducing calories, this natural sweetener embraces the concepts of wellness and vitality.
Within the realm of culinary magic, the stevia plant unveils a plethora of flavors and textures, transcending the realm of mere sweetness. Be it enhancing the delicate notes of a splendid cup of tea, or adding a subtle undertone of indulgence to savory dishes, the stevia plant stands as a versatile companion to culinary innovation.
As a beacon of hope for those seeking refuge from the perils of refined sugars, the stevia plant prides itself on its diverse applications. From the smoky tang of caramel to the mellow touch of honey, the variety of flavors concealed within the stevia leaf ensures that every taste bud is tantalized and satisfied.
Growing and Nurturing Your Very Own Stevia Herb
If you have a penchant for growing your own herbs and are fond of experimenting with natural sweeteners, cultivating a beautiful stevia plant could be a rewarding endeavor for you. This section will guide you through the process of successfully growing and caring for a stevia herb, empowering you to savor its delightful sweetness and harness its numerous health benefits.
To begin your journey of cultivating a thriving stevia plant, it is important to select a suitable location that provides abundant sunlight and well-drained soil. Find a sunny spot in your garden or create a container garden on your balcony to accommodate this versatile herb.
Once you have determined the ideal location, prepare the soil by ensuring it is loose, rich in nutrients, and well-aerated. To improve its drainage capabilities, consider incorporating organic matter such as compost or aged manure into the soil.
Now that the foundation is laid, it is time to sow your stevia seeds. Gently sprinkle the seeds on the soil surface, ensuring they are evenly distributed. Cover the seeds with a thin layer of soil and gently press them down to ensure good soil-to-seed contact.
To maintain proper moisture levels during germination, it is essential to water the seeds regularly. Keep the soil consistently moist, but not waterlogged, as excessive moisture can lead to rotting. It is advisable to use a watering can or gentle misting to prevent the disturbance of newly planted seeds.
As your stevia seedlings begin to emerge, it is imperative to thin them out, allowing sufficient space for each plant to grow to its full potential. A spacing of about 18 to 24 inches between plants ensures proper airflow and minimizes the risk of disease or pest infestation.

Throughout the growing season, be mindful of your stevia plant’s water requirements. While it appreciates consistent moisture levels, overwatering should be avoided as it can lead to root rot. Keep a watchful eye on the soil moisture and adjust your watering frequency accordingly.
Additionally, stevia plants benefit from regular feeding with a balanced organic fertilizer to support their growth. Carefully follow the instructions on the fertilizer packaging to ensure the correct dosage for your plant’s unique needs.
In conclusion, growing and nurturing a stevia plant is an enjoyable journey that rewards you with a sustainable and natural sweetener. By providing adequate sunlight, well-drained soil, and appropriate care, you can cultivate a bountiful stevia plant that will bring sweetness and healthfulness to your culinary endeavors.
Choosing the Right Soil and Location for Your Stevia Crop
Growing a thriving stevia crop requires careful consideration of the soil and location where it will be cultivated. Selecting the appropriate soil type and finding the ideal spot for planting are essential steps in ensuring the successful cultivation of your stevia plants.
Soil Requirements
To support the growth and development of stevia plants, it is crucial to provide them with a well-draining and fertile soil. Stevia plants prefer loam or sandy loam soils that are rich in organic matter. These types of soil allow for proper root development and prevent waterlogged conditions that could lead to root rot.

The soil pH level is of utmost importance as well. Stevia plants thrive in slightly acidic to neutral pH conditions, ideally ranging from 6.5 to 7.5. Conducting a soil test to determine the pH level and making necessary adjustments can significantly contribute to the healthy growth of your stevia crop.
Location Considerations
Choosing the right location for your stevia plants is essential for their proper growth and overall productivity. Stevia requires ample sunlight to thrive, so it is recommended to select a location that receives at least 6 to 8 hours of direct sunlight each day. Placing your stevia plants in a position that avoids excessive shade from nearby structures or trees is crucial for their photosynthesis and sugar production.
In addition to sunlight, adequate airflow is also crucial for the health of stevia plants. While they can tolerate some wind, excessive exposure to strong and constant winds can cause damage to the delicate stems and leaves. Therefore, finding a location that provides a balance between sun exposure and protection from strong winds is essential.
Summary:
Creating an optimal environment for your stevia plants starts with careful consideration of the soil type and location. Providing well-draining, fertile soil with a slightly acidic to neutral pH level is crucial for their healthy growth. Ensuring that the chosen location receives sufficient sunlight and offers adequate protection from strong winds will contribute to the overall success of your stevia crop.

Watering and Fertilizing Your Stevia Plant: Best Practices
Proper moisture management and nutrition play a crucial role in the healthy growth and development of a stevia plant. In this section, we will explore the dos and don’ts of watering and fertilizing your stevia plant, ensuring optimal conditions for its well-being without relying on explicit terminology.
1. Hydration essentials: To maintain your stevia plant’s hydration levels, be mindful of its moisture requirements. It is important to strike a balance between under-watering and over-watering. You should provide your stevia plant with adequate water while avoiding excessive saturation in the soil, preventing water-logging, and potential root rot.
2. Watering frequency: Understanding the watering frequency is crucial in caring for your stevia plant. Instead of using explicit terms, remember to check the moisture content in the soil regularly. Monitor its moisture levels by feeling the topsoil with your fingers. If the topsoil feels dry to the touch, it is an indication that watering may be necessary, whereas overly damp or soggy soil suggests a need for reduced watering.
3. Fertilizer selections: Proper nourishment is essential for your stevia plant’s growth. Instead of using direct language, make sure to provide balanced nutrition without overpowering your plant. Consider using organic fertilizers with low to medium concentrations of nutrients, ensuring gradual absorption and avoiding excessive chemical build-up.

4. Fertilizing frequency: Understanding the frequency of fertilization is crucial. Employ a mindful and measured approach without explicitly stating it. Opt for a schedule that allows your stevia plant to develop naturally, providing necessary nutrients gradually without overwhelming its root system.
5. Soil conditions: Maintaining optimal soil conditions influences the overall health of your stevia plant. Rather than naming specific requirements, ensure your plant’s well-being by utilizing well-draining soil rich in organic matter, promoting adequate air circulation and preventing water stagnation.
By following these guidelines and avoiding the mentioned pitfalls, you can ensure the success of your stevia plant’s irrigation and nutrition, enabling it to flourish and produce high-quality leaves for your sweetening needs.
Harvesting and Incorporating Stevia Leaves in Your Culinary Creations
Discover the art of utilizing the incredible potential of the stevia plant leaves to amplify the flavors and natural sweetness in your recipes.
When the time comes to harvest stevia leaves, the plants should be mature and thriving, with vibrant green foliage. It is pivotal to ensure that you collect the leaves just before the plant begins to flower, as this is when they possess the highest levels of sweetness.
- Put on a pair of gloves to protect your hands from the plant’s tiny hairs, which can cause skin irritation for some individuals.
- Select the leaves you wish to harvest, gently plucking them from the plant, being careful not to damage the stems or other leaves.
- Once you have collected a sufficient amount of leaves, thoroughly wash them under running water to eliminate any dirt or debris.
- Pat the leaves dry with a clean towel or allow them to air dry for a short while.
Now that you have harvested and prepared the stevia leaves, you can begin incorporating them into a range of enticing recipes:
- Create a homemade stevia-infused syrup by simmering a handful of fresh leaves in water, along with your preferred sweetener, such as honey or maple syrup. This syrup can be drizzled over desserts or used as a natural sweetener in various beverages.
- Add dried stevia leaves to your favorite herbal tea blends for a touch of natural sweetness.
- Enhance the flavors of baked goods, such as cookies and cakes, by grinding dried stevia leaves into a fine powder and substituting it for a portion of the sugar in the recipe.
- Infuse your jams and preserves with stevia leaves while they simmer to elevate the sweetness without relying on excessive amounts of sugar.
Experiment with different quantities of stevia leaves to achieve your desired level of sweetness in each recipe, as the intensity can vary depending on personal preferences. Careful consideration and experimentation will allow you to unlock the full potential of this natural sweetener.
Preserving and Storing Stevia Leaves for Future Use
When it comes to utilizing the potential of the stevia plant, it is essential to ensure that its leaves are preserved and stored properly for future use. This section explores effective techniques and methods to maintain the freshness and quality of stevia leaves, enabling their long-term use in various culinary and medicinal applications.
The Harvesting Process
Before delving into the specifics of storing stevia leaves, it is crucial to understand the proper harvesting process. Once the stevia plant reaches maturity, typically indicated by its vibrant green leaves, careful plucking is required to ensure optimal flavor and sweetness. Handpicking the leaves gently avoids damage, guaranteeing high-quality preservation and long-lasting freshness.
Drying the Leaves
One of the most common and effective techniques for preserving stevia leaves is the drying method. After harvesting the leaves, they should be spread out in a cool, well-ventilated area away from direct sunlight. This allows the leaves to gradually dry, retaining their natural sweetness and flavor. It is essential to monitor the drying process and ensure the leaves do not become brittle, as they may lose their potency if over-dried.
Tip: To speed up the drying process, the leaves can be loosely tied together and hung upside down.
Once the leaves are adequately dried, they should crumble easily when touched, indicating their readiness for storage.
Storage Techniques
Proper storage is key to preserving the quality of stevia leaves. The dried leaves should be stored in airtight containers, such as glass jars or resealable bags, to prevent exposure to moisture and air. These containers should be kept in a cool, dark place, such as a pantry or cupboard, to maintain the leaves’ potency and prevent any flavor deterioration.
Note: It is important to label the containers with the date of storing to keep track of the leaves’ freshness.
For longer-term storage, frozen stevia leaves can maintain their quality and sweetness. Simply place the dried leaves in resealable freezer bags and store them in the freezer. This method extends the shelf life and allows for the future use of stevia leaves even after several months.
By following these effective techniques for preserving and storing stevia leaves, enthusiasts can ensure a continuous supply of this natural sweetener for use in beverages, desserts, and other culinary delights.
FAQ
How do I use a stevia plant in cooking?
Using a stevia plant in cooking is quite simple. First, harvest the leaves from the plant. Rinse them thoroughly to remove any dirt or debris. Then, dry the leaves by either air drying them or using a dehydrator. Once the leaves are dry, grind them into a fine powder using a coffee grinder or mortar and pestle. The resulting stevia powder can be used as a natural sweetener in various recipes such as beverages, desserts, and sauces. Keep in mind that stevia is much sweeter than sugar, so you’ll need to use it sparingly.
Can I grow a stevia plant indoors?
Yes, you can definitely grow a stevia plant indoors. Stevia plants thrive in well-draining soil with ample sunlight, so make sure to place your pot near a sunny window. It’s best to start with a young stevia plant or grow it from seeds. Ensure that the plant receives at least 6-8 hours of sunlight per day and water it regularly to keep the soil moist. You can also fertilize the plant every month using a balanced fertilizer to promote healthy growth. With proper care, you can enjoy fresh stevia leaves right from your indoor garden.
What are the health benefits of using stevia?
Stevia offers several health benefits, which is why it has gained popularity as a sugar alternative. First and foremost, stevia is all-natural and contains zero calories, making it an excellent option for those looking to reduce their sugar intake or manage their weight. Additionally, stevia has a minimal impact on blood sugar levels, making it a safe choice for diabetics or individuals with blood sugar concerns. Some studies suggest that stevia may also have antioxidant and anti-inflammatory properties, although further research is needed. Overall, stevia is a wonderful alternative to sugar, offering sweet taste without the negative health effects.


