Discover the secret behind effortlessly transforming lackluster floors into radiant masterpieces that command attention. Explore the artistry of the floor buffer – a versatile tool that unlocks the true potential of your surfaces. In this guide, we delve into the intricacies of maneuvering this mighty machine to achieve stunning results, leaving behind a mirror-like finish.
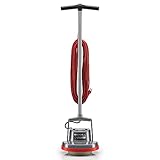
Unleash the Power: The floor buffer, also known as a rotary machine or a floor polisher, is an instrument that possesses the ability to redefine the appearance of any flooring. This formidable device boasts a flat, circular head adorned with various types of pads. Its robust motor is equipped to produce optimal revolutions per minute, effortlessly gliding across surfaces to remove imperfections and unveil a brilliant sheen.
Master the Technique: The skill lies in the gentle glide and controlled movements employed. Utilizing the floor buffer requires a keen eye, a steady hand, and a keen understanding of the unique characteristics of different floor materials. Each surface demands a distinct approach, whether it be hardwood, laminate, or tile. Comprehending the nuances to ensure an impeccable finish is the key to success.
Unlock the Potential: Armed with knowledge of the artful dance between the floor buffer and the surface at hand, you gain the power to transcend the ordinary and embrace the extraordinary. Marvel as dull and scuffed floors are transformed into showcases of elegance, their luster captivating all who step foot upon them. The floor buffer becomes your trusted ally, breathing life into lackluster spaces, and elevating them to unimaginable levels of sophistication.
Effective Cleaning with a Floor Buffer: A Step-by-Step Guide
In this section, we will explore the process of utilizing a powerful floor maintenance tool to achieve efficient and meticulous cleaning of various surfaces. By employing a high-speed rotary machine, commonly known as a floor buffer, you can enhance the cleanliness and appearance of your floors while saving time and effort.

To begin, it is important to prepare the area to be cleaned. Remove any obstacles or objects that may hinder the buffer’s movement and ensure that the floor is free from debris and loose materials. This ensures a smooth and uninterrupted cleaning process.
Next, examine the floor buffer and its components. Familiarize yourself with its handle, pad driver, power switch, and speed settings. Ensure the buffer is properly plugged in and that the buffer’s rotating pad is securely attached to the pad driver.
Now, adjust the speed settings on the buffer according to the type of surface being cleaned. Bear in mind that different surfaces require different speeds for optimal results. For delicate or polished surfaces, a slower speed setting is recommended, while more durable surfaces can withstand higher speeds.
Once the buffer is prepared, it is time to start the cleaning process. Begin by positioning the buffer at one corner of the area to be cleaned. Hold onto the handle firmly with both hands and switch on the power. Gradually move the buffer in a side-to-side motion, using controlled and even pressure.
As you navigate through the space, ensure that you cover the entire area methodically. Overlapping each path by a few inches guarantees thorough cleaning and prevents the formation of streaks or missed spots. Maintain a steady pace, avoiding sudden stops or changes in direction.

Periodically check the condition of the pad on the buffer. If it becomes saturated with dirt or grime, replace it with a clean one to maintain the effectiveness of the cleaning process. Additionally, if you notice any spills or particularly stubborn stains, pause the buffer and address these areas manually before continuing.
Once the entire area has been covered, switch off the buffer and inspect the results. Marvel at the transformed floors, freed from dirt, dust, and grime. Take a moment to clean and store the machine properly, ensuring its longevity and future usability.
| Key Steps to Use a Floor Buffer for Effective Cleaning: |
|---|
| 1. Prepare the area to be cleaned by removing obstacles and debris. |
| 2. Familiarize yourself with the components of the floor buffer. |
| 3. Adjust speed settings based on the type of surface. |
| 4. Start cleaning by positioning the buffer and switching on the power. |
| 5. Move the buffer in a side-to-side motion, covering the entire area. |
| 6. Replace the pad if it becomes saturated with dirt. |
| 7. Address spills or stubborn stains manually, if necessary. |
| 8. Switch off the buffer and assess the cleaned floors. |
| 9. Clean and store the floor buffer properly after use. |
Preparing the Surface and Equipment
In order to achieve optimal results when operating a floor buffer, it is essential to properly prepare both the surface being worked on and the equipment itself. By taking the necessary steps to ensure a clean and well-maintained surface, as well as inspecting and organizing the equipment, you can maximize the efficiency and effectiveness of the floor buffer.
Floor Surface Preparation:
Before beginning the floor buffing process, it is important to inspect the surface and make any necessary repairs, such as filling in cracks or removing any loose debris. Next, thoroughly clean the floor by removing dirt, dust, and other contaminants. This can be achieved by sweeping or vacuuming the area, followed by mopping with a suitable cleaning solution. By ensuring a smooth and debris-free surface, the floor buffer will be able to evenly distribute polish or wax, resulting in a more uniform and polished look.
Equipment Inspection and Organization:
Prior to using a floor buffer, it is crucial to inspect the equipment to ensure its functionality and safety. Check for any signs of damage or wear, such as frayed cords or loose parts, and address any issues before operation. Additionally, make sure all necessary attachments and accessories are readily available and in good condition.
After inspecting the equipment, organize the necessary supplies and tools in a convenient manner. This includes having an adequate supply of polish or wax, as well as clean mop pads or brushes. By having everything readily accessible, it eliminates unnecessary downtime during the floor buffing process.
Properly preparing the floor surface and equipment is the groundwork necessary for successful operation of a floor buffer. By taking the time to prepare and organize, you can enhance the efficiency and effectiveness of the floor buffing process, achieving a professional and polished result.
Adjusting the Floor Buffer Settings
When it comes to operating a floor buffing machine, the way the machine is set up plays a crucial role in achieving optimal results. In this section, we will explore the importance of adjusting the settings on a floor buffer and how it can affect the overall performance.

One key aspect to consider when adjusting the floor buffer settings is the speed or RPM (revolutions per minute). The speed at which the buffer rotates can vary depending on the surface being worked on and the task at hand. By adjusting the speed settings, you can effectively control the aggressiveness of the machine, allowing for greater precision and control.
Another important setting to consider is the pressure applied by the floor buffer. This setting determines how much downward force is exerted onto the surface. A higher pressure setting may be necessary for more stubborn stains or heavily soiled areas, while a lower pressure setting is suitable for regular maintenance and polishing.
Additionally, adjusting the brush or pad type is crucial for achieving the desired outcome. Different surfaces require different brush or pad materials, such as soft bristles for delicate floors or coarse pads for heavy-duty cleaning. By selecting the appropriate brush or pad, you can ensure efficient cleaning and prevent damage to the flooring.
Lastly, it is vital to determine the correct solution flow rate. This setting controls the amount of cleaning solution or water dispensed onto the surface. Adjusting the flow rate allows for even distribution of the cleaning solution, ensuring consistent cleaning results without over-saturating the floor.
| Setting | Function | Adjustment Range |
|---|---|---|
| Speed/RPM | Controls the rotation speed of the buffer | Variable, typically ranging from 150 to 3000 RPM |
| Pressure | Determines the downward force applied | Adjustable, typically ranging from 10 to 100 pounds |
| Brush/Pad Type | Selects the appropriate material for the surface | Varies based on the type of brush or pad used |
| Solution Flow Rate | Controls the amount of cleaning solution dispensed | Adjustable, typically ranging from 0 to 1 gallon per minute |
Operating the Floor Buffer Safely
Ensuring the safe operation of a floor buffer is crucial for both the operator and the environment. This section provides important guidelines and procedures to follow when using this powerful cleaning equipment.

1. Preparation
- Before operating the floor buffer, make sure you are wearing appropriate personal protective equipment (PPE) such as safety goggles, gloves, and non-slip shoes.
- Carefully inspect the floor buffer for any visible damages or malfunctions. Do not use the equipment if it is in poor condition.
- Clear the area of any obstacles, debris, or tripping hazards that may interfere with the operation of the floor buffer.
2. Proper Handling
- Keep a firm grip on the handle of the floor buffer at all times to maintain control and stability during operation.
- Ensure that the power cord is not obstructing your movement or creating a tripping hazard. Use cord management systems if necessary.
- Start the floor buffer at the lowest speed setting and gradually increase it as needed. Avoid sudden movements or excessive speed, as it may lead to loss of control.
3. Safe Work Practices
- Maintain a safe distance from walls, furniture, and other delicate objects to avoid accidental damage.
- Always keep your eyes forward and watch for any potential hazards or obstacles on the floor.
- Never leave the floor buffer unattended while it is running. Turn off the equipment and unplug it when taking breaks or when the task is completed.
By following these safety guidelines, you can ensure the effective and safe operation of a floor buffer, minimizing the risk of accidents or injuries. Remember, a well-maintained and properly used floor buffer can help you achieve a clean and polished floor surface effortlessly.