
Discovering the artistry of cultivating a blooming garden involves an array of fascinating tools. In this comprehensive guide, allow us to take you on a voyage of exploration through the realm of a tool that inspires garden enthusiasts and professionals alike. Its unique design and impeccable functionality serve as a key instrument in nurturing the growth of various botanical wonders.
Introducing the ingenious companion, aptly known as the plant excavation tool, which epitomizes the epitome of botanical magnificence. This meticulously crafted instrument sets itself apart, not merely as a mere gardening tool, but as an exquisite extension of one’s gardening prowess. Delving into the depths of soil with effortless precision, it demonstrates an unmatched ability to handle delicate flora with utmost care.
Unleashing Nature’s Splendor: Harnessing the power of this revolutionary tool offers an enchanting experience, as it effortlessly penetrates the fertile grounds with precision and purpose. Guiding the way for bulbs, seeds, and plants alike, it becomes an essential companion, enabling garden enthusiasts to mould their botanical fantasies into glorious realities. With every thrust into the earth, the plant excavation tool unveils a world of endless possibilities, nurturing the very essence of nature’s perpetual cycle.
Unearthing Boundless Potential: As a testament to its impeccable craftsmanship, the plant excavation tool stands as an embodiment of innovation in the realm of horticulture. Its ergonomic design, coupled with its sturdy structure, ensures a seamless grip and optimal control for both seasoned gardeners and budding enthusiasts. With this versatile instrument in hand, planting becomes an art form, where one can paint colorful strokes of life amidst the nurturing embrace of Mother Earth.
Proper Usage of a Bulb Planter: A Step-by-Step Guide
A bulb planter is an essential tool for efficiently planting bulbs in your garden or yard. In this section, we will guide you through the proper steps to ensure successful bulb planting without the need for intricate technical knowledge or experience. By following these straightforward instructions, you can create a beautiful and vibrant display of flowers.

| Step | Description |
|---|---|
| 1 | Select a suitable planting location |
| 2 | Prepare the soil |
| 3 | Insert the bulb planter into the soil |
| 4 | Remove the soil plug |
| 5 | Place the bulb into the hole |
| 6 | Cover the bulb with soil |
| 7 | Repeat the process for additional bulbs |
| 8 | Water the planted area |
| 9 | Clean and store the bulb planter |
Start by selecting a location in your garden that receives adequate sunlight and has well-draining soil. Prepare the soil by removing any weeds or rocks that may obstruct the bulb planter’s insertion. The next step is to insert the bulb planter into the soil at a depth suitable for the type of bulb you’re planting. After inserting, pull the planter back out to remove the soil plug.
Take your bulb and carefully place it into the hole created by the planter, ensuring it is positioned in the right direction according to the bulb’s instructions. Cover the bulb with the soil plug and gently firm the soil around it to secure it in place. Repeat these steps for each bulb you wish to plant, spacing them appropriately.
Once all the bulbs are planted, water the area thoroughly to encourage proper root establishment. Finally, clean the bulb planter by removing any dirt or debris, and store it in a suitable location for future use.
By following these step-by-step instructions, you can confidently use a bulb planter to plant your favorite bulbs and create a stunning garden that will bloom beautifully in the upcoming seasons.
Selecting the Right Tool for Planting Bulbs
In any gardening endeavor, it is crucial to have the proper tools at hand to ensure success. When it comes to planting bulbs, selecting the right bulb planter for your needs can make all the difference. This article aims to provide guidance on how to choose the most suitable bulb planter by considering various factors.

Consider the Size: One important aspect to consider when selecting a bulb planter is its size. The size of the planter should align with the specific bulb sizes you intend to plant. Choosing a planter too small may result in overcrowded bulbs, while a planter that is too large can lead to uneven distribution and wasted space.
Material Matters: Another crucial factor to consider is the material from which the bulb planter is made. Common materials include stainless steel, carbon steel, and plastic. Stainless steel and carbon steel bulb planters are known for their durability and sturdiness, making them ideal for heavy-duty use. On the other hand, plastic planters offer lightweight and affordable options suitable for smaller gardening projects.
Design and Ergonomics: The design and ergonomics of a bulb planter can greatly affect your gardening experience. Look for planters with comfortable handles and a user-friendly design that allows for easy gripping and maneuvering. Ergonomic features, such as a spring-loaded mechanism for effortless soil release, can significantly reduce strain and fatigue during planting.
Depth and Precision: Different bulb species require varying planting depths, making it essential to choose a planter that can accommodate these requirements. Some planters come with adjustable depth settings, allowing you to plant bulbs at the optimal depth easily. Additionally, selecting a planter with precise marking indicators can help ensure accurate planting and consistent results.
Consider Your Gardening Style: Lastly, it is crucial to consider your personal gardening style when selecting a bulb planter. If you prefer manual tools and enjoy the hands-on experience, a handheld bulb planter might be the best choice. Alternatively, if you have a larger planting area or prefer a more efficient approach, consider a long-handled or even an electric bulb planter for quicker and easier planting.

By considering factors such as size, material, design, depth, and your personal gardening style, you can make an informed decision when selecting a bulb planter that will suit your specific needs. Choosing the right tool will contribute to a seamless and enjoyable bulb planting experience and ultimately result in thriving and beautiful blooms.
Preparing the Ground for Planting
The success of planting bulbs depends greatly on the preparation of the planting area. Before commencing the actual planting process, it is important to properly prepare the ground to provide the optimal environment for bulb growth. This involves several key steps to ensure the soil is rich, well-drained, and free from obstacles that may inhibit bulb development.
1. Soil Testing: Before planting bulbs, it is essential to assess the quality and composition of the soil. Conducting a soil test will provide valuable information on the pH level, nutrient content, and organic matter present in the soil. This allows for amendments to be made, if needed, to create a favorable soil environment for the bulbs.
2. Clearing the Area: Remove any existing plants, rocks, weeds, or debris from the planting area. This helps eliminate competition for nutrients and space, ensuring the bulbs have a clear space to grow. Additionally, it allows for better access and visibility when using the bulb planter.
3. Loosening the Soil: Use a garden fork or tiller to loosen the soil in the planting area. This helps improve the soil’s structure and promotes good drainage. Loosening the soil also facilitates the penetration of the bulb planter, making it easier to create the necessary holes for planting the bulbs.

4. Adding Organic Matter: Incorporate organic matter such as compost, well-rotted manure, or peat moss into the soil. This helps improve the soil’s fertility, drainage, and moisture retention capabilities. Spread a layer of organic matter on top of the loosened soil and work it in with a garden fork or tiller.
5. Leveling the Ground: After adding organic matter, use a rake or garden tool to level the planting area. This ensures an even surface for planting and enables the bulb planter to make consistent, uniform holes. Leveling the ground also helps with water distribution and prevents waterlogging or pooling around the bulbs.
6. Marking the Planting Spots: Utilize marking tools, such as small stakes or markers, to indicate the desired locations for planting the bulbs. This helps maintain proper spacing and ensures an organized arrangement of bulbs. Consider the specific planting requirements for each bulb variety to determine the appropriate spacing distance.
By following these steps to prepare the ground for planting bulbs, you can create an optimal environment for bulb growth and maximize the chances of successful plant development. Proper soil preparation sets the foundation for healthy and beautiful bulb blooms in the future.
Digging the Hole with Your Bulb Planter
In this section, we will explore the process of using a bulb planter to dig the perfect hole for planting your bulbs. Digging the hole is a crucial step in the planting process, as it sets the foundation for healthy growth and ensures that the bulbs are positioned in the right depth and orientation. By using the bulb planter effectively, you can easily create well-prepared holes without much effort.
1. Selecting an Ideal Spot
Before using the bulb planter, it is important to choose the right area for planting your bulbs. Look for a spot in your garden that receives adequate sunlight and has well-drained soil. Avoid areas with heavy clay or waterlogged soil, as this can hinder the growth of your bulbs.
2. Preparing the Bulb Planter
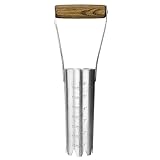
Start by equipping yourself with a bulb planter that suits your needs. Ensure that the tool is clean and in good condition before use. The bulb planter typically consists of a long handle with a cylindrical or conical-shaped blade at the bottom. The blade should be sharp, allowing for easy penetration into the soil.
- Attach the blade securely to the handle, ensuring that it is stable and won’t come loose during use.
- Inspect the blade for any damage or rust. If needed, clean or replace the blade to ensure optimal performance.
3. Digging the Hole
When you are ready to dig the hole, hold the bulb planter firmly with both hands. Use your foot to apply pressure to the blade, pushing it into the soil. As you push the blade down, twist it slightly in a clockwise motion to create a neat and uniform hole.
- Ensure that the depth of the hole matches the recommendations for the specific type of bulbs you are planting. Different bulbs may require different planting depths.
- While digging, be mindful of any obstructions such as rocks or roots. These can impede the progress of the bulb planter or damage the blade.
Once the hole is dug, release the pressure on the handle to remove the bulb planter from the soil. You should now have a well-prepared hole that is ready for planting your bulbs.
Planting Bulbs and Nurturing their Growth
Bulbs are nature’s hidden treasures, waiting patiently for their moment to bloom and grace our gardens with vibrant colors and delightful aromas. Discover the art of planting bulbs and nurturing their growth to create a captivating floral display that will enchant both your senses and those of your visitors.
Choosing the Right Bulbs
When it comes to selecting bulbs, the options are as diverse as the flowers they produce. From dainty daffodils to majestic tulips, each bulb variety offers its unique charm. Consider the bloom time, color, and height to ensure a harmonious blend within your garden. Opt for high-quality bulbs to guarantee healthy growth and promising results.
Preparing the Soil
Before planting your bulbs, prepare the soil to provide them with optimal growing conditions. Loosen the earth with a garden fork or trowel to allow for proper root development. Enhance the soil’s fertility by adding organic matter, such as compost or well-rotted manure. This will ensure a nutrient-rich environment that promotes strong and vigorous growth.
Tip: It’s essential to choose a planting location that receives adequate sunlight, as most bulb varieties thrive best in full or partial sun.
Plant the bulbs at the right depth, typically at a depth three times the height of the bulb. For larger bulbs, use a bulb planter or a handheld trowel to dig a hole, making sure the pointed end faces upwards. Gently backfill the hole, ensuring the bulb sits securely and snugly in the soil.
Note: Remember to space the bulbs according to the recommended guidelines for each specific variety to allow for proper air circulation and avoid overcrowding.
After planting, provide a generous soaking to give the bulbs a good start. Apply a layer of mulch to conserve moisture, suppress weeds, and protect the bulbs from extreme temperature fluctuations.
Caring for the Bulbs
As the bulbs begin to grow, proper care is crucial to support their development. Regularly water them, ensuring the soil remains consistently moist but not waterlogged. During dry spells, increase watering frequency to prevent the soil from drying out.
Tip: Consider using a soaker hose or drip irrigation system to deliver water directly to the soil, effectively hydrating the bulbs without wetting their foliage.
As the blooms fade, deadhead the flowers to divert the plant’s energy toward bulb development. Allow the foliage to yellow and wither naturally, as this process replenishes the bulb’s energy reserves for the next growing season. Refrain from cutting or removing the foliage prematurely.
Note: For naturalizing bulbs, where they are left undisturbed to multiply over time, refrain from removing the foliage until it has completely died down.
With a little patience and care, your bulb garden will reward you with a splendid display of nature’s beauty. Enjoy the magical journey of planting bulbs and witnessing the wonders of their growth!
FAQ
What is a bulb planter and how does it work?
A bulb planter is a gardening tool specifically designed for planting flower bulbs. It has a cylindrical tube with a hollow bottom and a handle. To use the bulb planter, you simply push it into the soil, twist a bit, and then lift it out. This creates a hole in the soil where you can easily place the bulb.
Why should I use a bulb planter instead of just using my hands?
Using a bulb planter offers several advantages over using your hands. Firstly, it allows you to create uniform and precise holes for planting bulbs, ensuring proper spacing and an attractive display. Additionally, it minimizes damage to the bulbs and prevents strain on your hands and wrists.
When is the best time to use a bulb planter?
The best time to use a bulb planter is typically in the fall, before the ground freezes. This allows the bulbs to establish roots before winter and bloom in the spring. However, you can also use a bulb planter in early spring if you missed the fall planting window.
Can I use a bulb planter for other types of plants?
While bulb planters are primarily designed for planting flower bulbs, they can also be used for planting other small plants, such as seedlings or small vegetable plants. However, it may not be suitable for larger plants or plants with extensive root systems.
How do I take care of a bulb planter?
To keep your bulb planter in good condition, it’s important to clean it after each use by removing any soil or debris. You can use a brush or rinse it with water. Additionally, you should store it in a dry place to prevent rusting. Proper maintenance will ensure the longevity of your bulb planter.


